How to Create a Simple, Free Blog with Hugo and GitHub Pages
Authoring technical content is a skill. Like any skill, the only way to improve it is to practice. An easy way to author and share technical content is to create a blog and share your technology experience with others on the Internet. A common misconception is that creating your own website or blog requires technical expertise (such as experience with databases, web servers, a content management system like WordPress, or virtual machines) and financial investment (renting a virtual machine from a public cloud provider or hosting your own within your homelab).
Ideally, we should have three goals when creating and maintaining a blog:
- No/Low-Cost - Free or as close to free as possible.
- Productive - Easy to write in and easy to maintain.
- Cloud Native - Utilizes public cloud services for hosting, allowing for infinite scaling.
We can use the following technologies to accomplish these goals:
- Markdown - A markup language that is extremely easy to read natively, easy to write in, and can be easily converted into HTML.
- Hugo - A static site generator written in the Go language that allows for content written in Markdown to be rendered into HTML webpages.
- GitHub Pages - A GitHub service that hosts web content (such as HTML webpages) stored in a GitHub repository.
In this post, we will show how you can create your own blog for free using the above technologies. We will build our blog using an Ubuntu 20.04 host (although most instructions are feasible on any Linux operating system, including Windows Subsystem for Linux [WSL]).
Create GitHub Repository
First, we need to create a repository on GitHub to house our blog. If you do not have an existing GitHub account, you can create one for free here. Once your GitHub account is created, log into your account here.
From the GitHub homepage, left click on the plus sign in the upper right corner of the page, as highlighted below.

Left click on the “New repository” option from the dropdown menu that appears, as highlighted below.

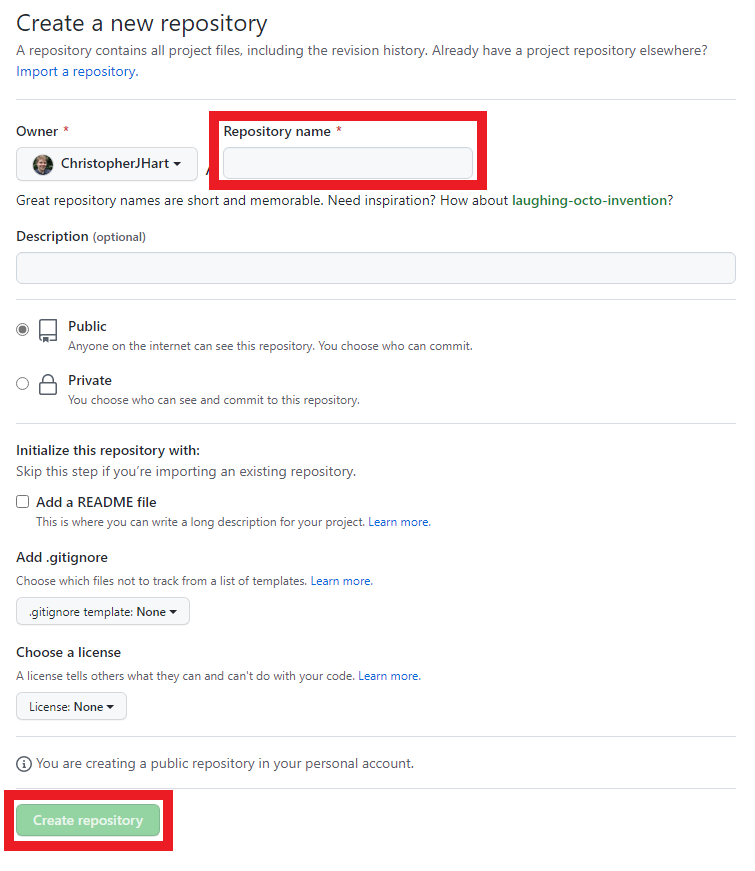
Near the top of the form that appears, insert a valid name for the new repository. For a person blog, name the repository blog works perfectly. An example is shown below with the repository name field highlighted.
Install Hugo
Then, we need to install Hugo on our Linux host. The steps needed to install Hugo vary from one operating system to another, so I recommend referencing Hugo’s installation documentation for more details. Since I am working with an Ubuntu 20.04 host, I will use snap to install Hugo to my Linux host as shown below.
1
2
christopher@ubuntu-playground:~/GitHub/blog-hugo$ sudo snap install hugo --channel=extended
hugo (extended/stable) v0.96.0 from Hugo Authors installed
Create Hugo Site
Now that Hugo is installed on our Linux host, we can create a new blog site with Hugo using the hugo new site command. This command takes a single argument, which will be the name of the folder Hugo creates that contains our blog site. An example of this command is shown below, where the blog-hugo folder is created through the hugo new site blog-hugo command.
1
2
3
4
5
6
7
8
9
10
11
12
13
christopher@ubuntu-playground:~/GitHub$ hugo new site blog-hugo
Congratulations! Your new Hugo site is created in /home/christopher/GitHub/blog-hugo.

Just a few more steps and you're ready to go:

1. Download a theme into the same-named folder.
   Choose a theme from https://themes.gohugo.io/ or
   create your own with the "hugo new theme <THEMENAME>" command.
2. Perhaps you want to add some content. You can add single files
   with "hugo new <SECTIONNAME>/<FILENAME>.<FORMAT>".
3. Start the built-in live server via "hugo server".

Visit https://gohugo.io/ for quickstart guide and full documentation.
Create Local Git Repository
Next, we need to create a local git repository on our Linux host within our new Hugo site so that we can push changes we make to our blog to GitHub. First, change your current directory to the blog-hugo directory that was previously created by the hugo new site command.
1
cd blog-hugo
Next, follow the instructions provided by GitHub to create a new local git repository, add files to staging, commit them to the local git repository, add the GitHub repository as a remote repository, and push the added files to GitHub.
A modified example of these instructions are below.
1
2
3
4
5
6
git init
git add -A
git commit -m "first commit"
git branch -M main
git remote add origin https://github.com/ChristopherJHart/blog-hugo.git
git push -u origin main
Install Hugo Theme
Next, you will most likely want to install a Hugo theme to personalize your blog. Hugo provides a repository of themes you can select from that are tailored to specific styles.
I am a fan of the m10c theme, which is a responsive minimialist theme tailored for blogs. I will install this theme with the git submodule add https://github.com/vaga/hugo-theme-m10c.git themes/m10c command, which clones the git repository stored on GitHub for the theme inside of the themes/m10c folder of your blog site.
1
2
3
4
5
6
7
8
christopher@ubuntu-playground:~/GitHub/blog-hugo$ git submodule add https://github.com/vaga/hugo-theme-m10c.git themes/m10c
Cloning into '/home/christopher/GitHub/blog-hugo/themes/m10c'...
remote: Enumerating objects: 397, done.
remote: Counting objects: 100% (120/120), done.
remote: Compressing objects: 100% (34/34), done.
remote: Total 397 (delta 93), reused 86 (delta 86), pack-reused 277
Receiving objects: 100% (397/397), 913.42 KiB | 9.32 MiB/s, done.
Resolving deltas: 100% (146/146), done.
Note: The theme you choose may have additional instructions! Consult the documentation for the theme that you choose to see if any additional steps need to be taken to properly install your theme.
Modify Hugo Configuration
Now we need to modify the config.toml file within the root of our blog site to personalize the site further. You will most likely want to modify the following fields:
- baseURL: This should be set to the URL GitHub Pages will use to host your blog, which will depend on the name of the GitHub repository you created. If the GitHub repository is named
<USERNAME>.github.io, then the value ofbaseURLwill behttps://<USERNAME>.github.io/. If the GitHub repository has any other name, then the value ofbaseURLwill behttps://<USERNAME>.github.io/<REPOSITORY_NAME>/.- For example, my GitHub username is
ChristopherJHart. If the GitHub repository is namedChristopherJHart.github.io, then the value ofbaseURLwill behttps://ChristopherJHart.github.io/. - For example, my GitHub username is
ChristopherJHart. If the GitHub repository is namedblog-hugo, then the value ofbaseURLwill behttps://ChristopherJHart.github.io/blog-hugo/.
- For example, my GitHub username is
- title: This will be the title of your blog site as it appears at the top of a visitor’s web browser when your site is open. It will also appear underneath your avatar, if one is present.
- theme: The name of the theme Hugo should use to render your site. In my example, this will be set to
m10c, since that is the name of the theme I am using.
The [params] key typically defines parameters that the theme will use to render your blog site. Under the [params] key, I will modify the following fields for the m10c theme:
- author: The name of the author of the blog site. This will typically be your name (either your real name or an online handle).
- description: A brief description of the content of your blog. This will appear underneath the title of your blog (as defined by the
titlefield) underneath your avatar.
In the m10c theme, if you want to add links to your social media, you can do so with one or more [[params.social]] keys. Each key will have the three fields at a minimum:
- icon: A string representing the name of the icon to display for this particular social media platform. This string will be a key in the m10c theme’s icons.json file and is typically the name of the social media platform in lowercase (e.g.
twitter,facebook,github, etc.). - name: The name of the social media platform, which will appear if the user hovers their cursor over the social media icon that is displayed. This will typically be the stylized name of the social media (e.g.
Twitter,Facebook,GitHub, etc.). - url: The URL to your account on the relevant social media platform. This would be your GitHub account, Twitter account, etc.
Example contents of a valid config.toml file can be found below.
1
2
3
4
5
6
7
8
9
10
11
12
13
14
15
16
17
18
baseURL = "https://christopherjhart.github.io/blog-hugo/"
languageCode = "en-us"
title = "Christopher Hart's Blog"
theme = "m10c"

[params]
  author = "Christopher Hart"
  description = "A blog about all things technical."

  [[params.social]]
    icon = "github"
    name = "GitHub"
    url = "https://github.com/ChristopherJHart"

  [[params.social]]
    icon = "twitter"
    name = "Twitter"
    url = "https://twitter.com/_ChrisJHart"
After modifying your config.toml file accordingly, use git to commit and push the changes from your local repository to GitHub.
1
2
3
git add config.toml
git commit -m "Modify configuration file"
git push origin main
Create New Hugo Post
Next, let’s use Hugo to create our first post with the hugo new command. This command takes a single argument, which is the name of the Markdown file where your blog post will be written. In Hugo, general content is stored in the content directory, and blog posts are specifically stored in the posts directory within the content directory. We will execute the hugo new posts/first-post.md command to create our first post.
1
2
christopher@ubuntu-playground:~/GitHub/blog-hugo$ hugo new posts/first-post.md
/home/christopher/GitHub/blog-hugo/content/posts/first-post.md created
The contents of the first-post.md file will look something like this.
1
2
3
4
5
---
title: "First Post"
date: 2022-05-27T19:13:06-04:00
draft: true
---
In Hugo, blog posts have a header that contain metadata about the post, such as the post’s title (title), date of publishing (date), and its draft status (draft). I will modify this file to have a “body” by adding the string This is my first post! Hello world! to the bottom of the file, as shown below. I will also flip the value of draft in the post header from true to false, which will ensure the new post appears on the blog site once it is published.
1
2
3
4
5
6
7
---
title: "First Post"
date: 2022-05-27T19:13:06-04:00
draft: false
---

This is my first post! Hello world!
After modifying your first blog post, use git to commit and push the changes from your local repository to GitHub.
1
2
3
git add content/posts/first-post.md
git commit -m "Add first blog post"
git push origin main
Test Hugo Configuration
Then, let’s ensure Hugo can parse the configuration file and build our new blog post successfully. We can do this easily by simply running the hugo command. If Hugo encounters any errors, they will be reported here. If the site is successfully built, then you will see output similar to the following.
1
2
3
4
5
6
7
8
9
10
11
12
13
14
christopher@ubuntu-playground:~/GitHub/blog-hugo/blog$ hugo

                   | EN
-------------------+-----
  Pages            |  7
  Paginator pages  |  0
  Non-page files   |  0
  Static files     |  2
  Processed images |  0
  Aliases          |  1
  Sitemaps         |  1
  Cleaned          |  0

Total in 21 ms
Set Up GitHub Actions Workflow
Lastly, we need to set up a GitHub Actions workflow that will automatically build and deploy our blog to GitHub Pages. This workflow is defined by a YAML file in the .github/workflows directory structure at the root of the project. First, let’s create this directory with the mkdir -p .github/workflows command as shown below.
1
christopher@ubuntu-playground:~/GitHub/blog-hugo$ mkdir -p .github/workflows
Then, we will create a new file within the .github/workflows directory named deploy_gh_pages.yaml with the following contents.
1
2
3
4
5
6
7
8
9
10
11
12
13
14
15
16
17
18
19
20
21
22
23
24
25
26
27
28
29
30
31
32
33
34
35
36
---
name: Deploy Hugo site via GitHub Pages

on:
  push:
    branches:
      - main # Set a branch to deploy
  pull_request:

permissions:
  contents: write

jobs:
  deploy:
    runs-on: ubuntu-22.04
    steps:
      - uses: actions/checkout@v2
        with:
          submodules: true # Fetch Hugo themes (true OR recursive)
          fetch-depth: 0 # Fetch all history for .GitInfo and .Lastmod

      - name: Setup Hugo
        uses: peaceiris/actions-hugo@v2
        with:
          hugo-version: "latest"
          extended: true

      - name: Build
        run: hugo --minify

      - name: Deploy
        uses: peaceiris/actions-gh-pages@v3
        if: github.ref == 'refs/heads/main'
        with:
          github_token: ${{ secrets.GITHUB_TOKEN }}
          publish_dir: ./public
This GitHub Actions workflow will:
- Clone the contents of your GitHub repository within an ephemeral Ubuntu 22.04 container running on GitHub’s infrastructure.
- Install the latest extended version of Hugo within the Ubuntu container.
- Use Hugo to build a minimized version of your blog site.
- Deploy the blog site to a branch of your GitHub repository named “gh-pages” if a change is made to the main branch of your GitHub repository.
After creating this file, use git to commit and push the changes from your local repository to GitHub.
1
2
3
git add .github/workflows/deploy_gh_pages.yaml
git commit -m "Add GitHub Actions workflow"
git push origin main
Configure GitHub Pages
Next, we need to set up the GitHub Pages component of our blog. This will allow GitHub to automatically build and serve our website whenever changes are made to the underlying repository. First, left click on the “Settings” tab near the top of the repository. An example is below with the “Settings” button highlighted in red.

In the left hand pane, locate and left click on the “Pages” category. An example is below with the “Pages” category highlighted in red.

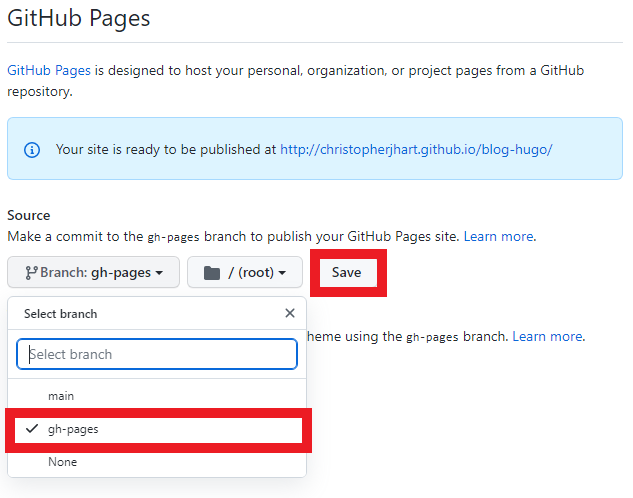
By default, GitHub Pages will be disabled for this repository. To enable it, we need to select a branch for GitHub Pages to build and serve our website from. In the middle pane under the “Source” section, left click on the “None” dropdown menu. An example is below with the “None” dropdown menu highlighted in red.

Left click on the “gh-pages” option from the dropdown menu that appears. This will allow GitHub Pages to build and serve our website based upon changes made in the gh-pages branch of our repository, which our GitHub Actions automatically pushes to. An example is below with the “gh-pages” option from the dropdown menu highlighted in red. Once you have modified this setting, left click on the “Save” button, also highlighted in red.
In a blue notification near the top of the middle pane, GitHub will state that our website is ready to be published at a specific URL. GitHub will deploy your website based upon the contents of the “gh-pages” branch. After a few minutes, following the URL in this blue notification will show our website, as shown below.

Conclusion
Using a static site generator such as Hugo alongside a free hosting service like GitHub Pages lets you quickly author and share technical content in a blog format. Creating content in Markdown is highly productive, as you can maximize the amount of time creating content compared to the amount of time worrying about the presentation of the content. Most importantly, this solution is completely free, which means it is highly accessible to all content creators across the globe!